
Most advanced Form functions involve the use of a formula. As such, it is critical that you understand how to create formulae to get the most out of our advanced features.
In this article
- Field Data Names
- Formula and Text Builders
- Referencing Field Values
- Dynamic Value
- Visibility
- Read-Only
- Required
- Validation
- Referring to Data Source Columns
Field Data Names
The unique data name of a field can be referenced in other fields and outputs. For example, a field to collect a customer's name might be customer_name or custName, so its value is identifiable when referencing.

Cannot begin with a number, contain spaces, or include special characters.
Formula and Text Builders
Formula and Text Builders are on numerous properties throughout the platform (Hammer Icon). Allowing for dynamic values using formulae or referencing other fields to drive the field's value.

Enter a formula directly into the property's text box or hit the Hammer Icon launching the supported builder.
Where inserting field datanames and/or functions aid formula creation, add comments, and validate before applying.


Formula Builders allow for functions and complex scenarios, whereas Text Builders have a built-in CONCAT() function simply requiring static text with field datanames.
Insert a Field
Use the dropdown to search and select existing form fields, inserting their datanames into your formula.
Insert a Function
Use this dropdown to search, view usage examples, and select functions, inserting function structure and placeholders for required values.
When entering a formula, use the TAB key to search and autocomplete formula function names.
Insert Comments
We’ve added a new icon to the Formula Builder, which, when clicked, will insert a comment for you (denoted by /* */). Use it to ensure everyone understands your formulas' more complicated parts (and to discourage unwanted tampering).

Validate Formula
Click the icon adjacent to Add Comment to validate the formula. If this button is disabled, the formula is valid. Make changes to the formula and validate.
Should the form validator detect any errors in your formula, an error message with details will display for resolving.

Referencing Field Values
First, you need to know how to address or refer to a field in your form.
This is done by using placeholders wherever you want the system to insert answers from fields of your Form. Placeholders are entered using the unique data name property of the Form field, wrapped in curly braces: {{dataname}}.
So, for example, if you have a Text field with a data name of "field1", you'd refer to it as {{field1}} in a formula or text builder.
Note that placeholders and all other functions available for use in a formula are case-sensitive.
Now that you know how to reference field values, you can use this knowledge to build a formula.
A formula contains placeholders or various operators and functions, which together give a result - much the same as an Excel formula works.
When the app runs the formula, any placeholders are replaced with the value currently stored in the field referenced by that placeholder.
Note that we use single quotes ( ' ) to include static values as part of a formula. Encasing the text in opening and closing single quotes.

CONCAT({{dataname}} , 'Static Text')
Let's look at a few examples...
We've set up an Action field that allows user interactions to be configured based on the button selected. For these examples, we won't use this functionality but simply that when a button is pressed, the field's value becomes the selected button's text.

The above image shows an Action field with a data name of btnAction and five buttons text (Dynamic Value, Visibility, Read-Only, Required, Validation) and colors configured for the following examples.

Dynamic Value
Referencing the Action field's data name, {{btnAction}}, in a Text field's Dynamic Value property. The field's value will change depending on the button selected.
{{btnAction}}

Visibility
The 1st thing to note is that Visibility properties have a built-in IF condition. If the result is true, the field will be visible, and if the result is false, the field will not be visible. Invisible fields referenced in other fields or output return a blank/no value.
If you intended not to display fields in-app calculating values, use the Hidden field type (Advanced Field) instead.
Create a formula that returns a true/false result.
The example references the Action field's data name, {{btnAction}}, and compares it using an Equals To function to static text, 'Visibility'. This static text should match the button's value.
The field will become visible when the Action field's "Visibility" button is pressed.
{{btnAction}} = 'Visibility'

Read-Only
The 1st thing to note is that Read-Only properties have a built-in IF condition. If the result is true, the field will be read-only and uneditable unless a dynamic value drives it. If the result is false, the field can be edited by direct user input.
Create a formula that returns a true/false result.
The example references the Action field's data name, {{btnAction}}, and compares it using an Equals To function to static text, 'Read-Only'. This static text should match the button's value.
The field will become read-only when the Action field's "Read-Only" button is pressed.
{{btnAction}} = 'Read-Only'

Required
The 1st thing to note is that Required properties have a built-in IF condition. If the result is true, the field will require a value to be entered (not blank) before navigating away from the page. If the result is false, the field won't require a value.
Create a formula that returns a true/false result.
The example references the Action field's data name, {{btnAction}}, and compares it using an Equals To function to static text, 'Required'. This static text should match the button's value.
The field will require a value preventing the user from navigating away from the page when the Action field's "Required" button is pressed.
{{btnAction}} = 'Required'

Validation
The 1st thing to note is that the field requires a value to validate.
For this example, the field's value is dynamically driven from an IF condition when the Action button is pressed. When pressed, the field's value becomes the text "Valid".
IF(condition, trueVal, falseVal)
IF({{btnAction}} = 'Validation' , 'Valid' , 'Not Valid')

2ndly, Custom Validation properties have a built-in IF condition. If the result is true, the field's value has passed the validation check, and the user can navigate away from the page. If the result is false, the custom validation message will display, preventing page navigation and requiring the field's value to be corrected.
Create a formula that returns a true/false result.
The example references the field's data name, {{validation}}, and compares it using an Equals To function to static text, 'Valid'. If the field's value is text "Valid", then no validation message displays.
{{validation}} = 'Valid'

Depending on your validation needs, you're not limited to only checking exact text but also formats, contains, range, character count, etc.
Be sure to peruse our Formula Cheat Sheet for available options.
Referring to Data Source Columns
The Form Designer allows you to link Choices fields to Data Sources that you've created.
Data Sources can have numerous columns; you may want to refer to the values in these columns when creating a Form.

Data Source column indexes always start at zero. The first column has an index of 0, the second column has an index of 1, the third column is an index of 2, and so on.
The first column in a Data Source (the Value column) is always used as a field's answer by default.
If you want to refer to any other column's value, you need to use an indexing syntax - specifically, you need to add square brackets around the column's index number - e.g. {{choices[index]}}
Example
Let's look at an example using the above Inventory data source that contains your item list with columns for name, unit cost, quantity, etc.
What you'll need...
-
a Choices field linked to the data source allowing the user to select an item from a list of names. The Choices field value can be the name selected. {{itemChoice}}
-
a Numeric field that captures the quantity of the item selected. {{quantity}}
-
a Numeric field that will calculate the total amount by multiplying the item's unit price by quantity.
Then, in the Dynamic Value property of the field calculating the total amount, define a formula:
{{itemChoice[4]}} * {{quantity}}
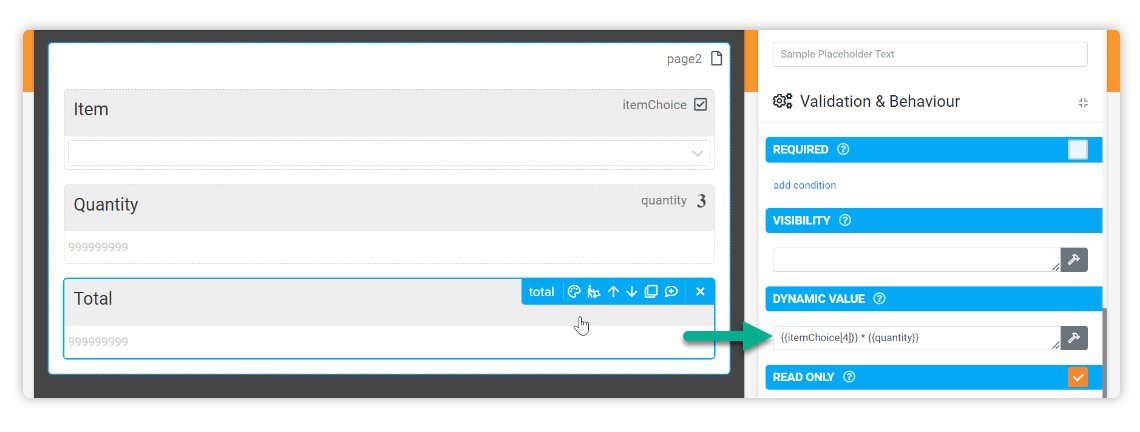
Note the square brackets and index value of 4 used to refer to the 5th column (Unit Cost) in the Inventory Data Source.
